DIY Board and Batten Half Wall: Because Full Walls Are Just Show-Offs
Let’s be honest-your walls are naked. They’re standing there, bland, lifeless, and flatter than a soda left open overnight. It’s time to give them a little drama. A little spice. A little wood.
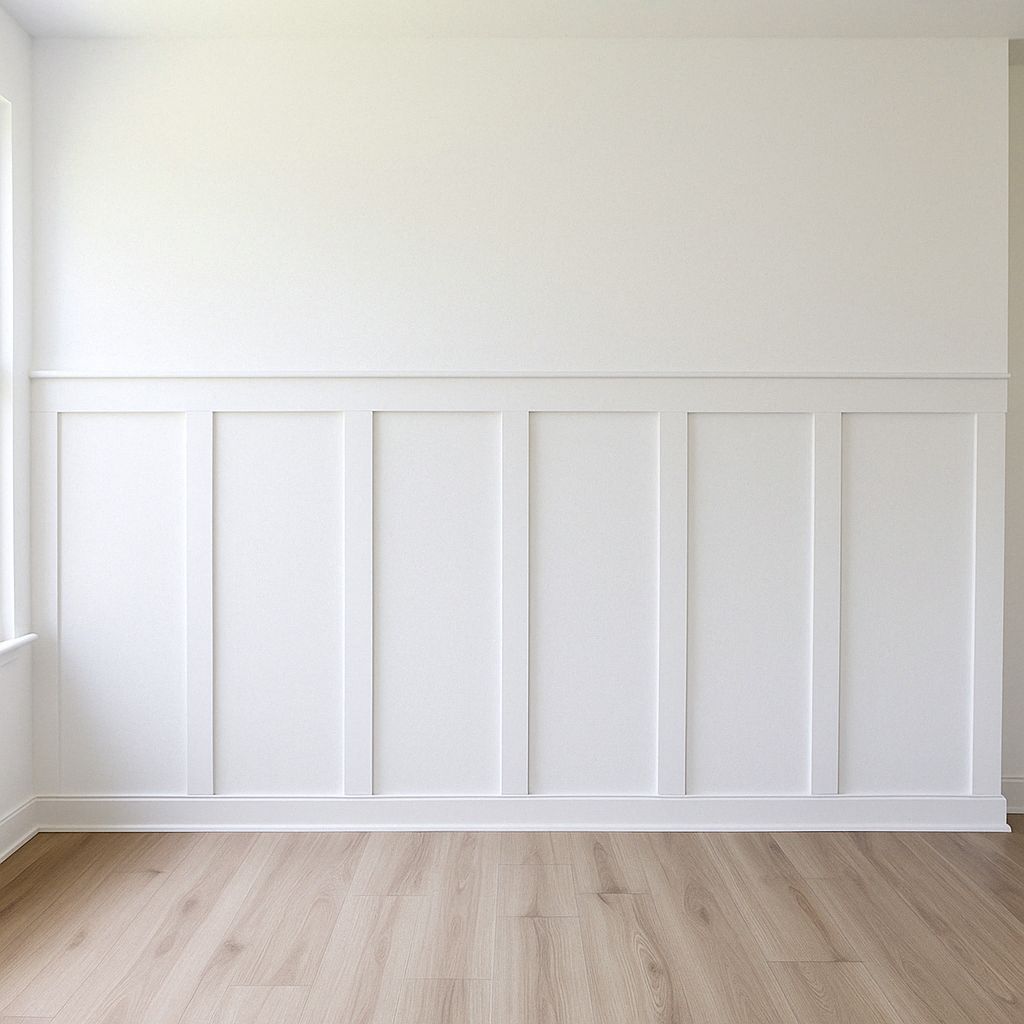
Introducing the DIY Board and Batten Half Wall. A wall that is elegant, classy, and just charming enough to make your guests say, “Wow, did you hire someone?” No, Susan. I am someone.
Table of Contents
What Even Is a Board and Batten Wall?
It’s what happens when “just paint the wall” grows up, gets a job, a Pinterest account and a superiority complex.
A board and batten wall is a decorative treatment made from vertical strips (battens) layered over a smooth wall surface—usually your existing drywall. Originally used on the outside of barns and buildings to keep the wind from slapping your chickens, it’s now a top-tier interior design flex.
Why is it so popular?
Because it’s stylish without trying too hard. It brings texture and personality to flat, lifeless walls, while making your space look like it hired a designer—without actually hiring one. Plus, it’s versatile. Entryways, bathrooms, living rooms, bedrooms—if there’s a wall, board and batten can probably improve it.
It’s also a crowd favorite in the DIY world: affordable, beginner-friendly, and way more impressive than another layer of gray paint.
I still remember my first DIY board and batten project. It was me, my dog, and our 27th screening of Independence Day, just vibing on the couch. At some point between Will Smith punching an alien and me finishing my third snack, I looked down the hallway and thought, “That’s one boring-ass wall.”
Later that night—fueled by too much Pinterest and just the right amount of delusion—I declared war. By morning, I was armed with coffee, raw determination, and my cat perched on the back of the couch, supervising like a tiny, judgmental foreman.
By the end of the weekend, the wall had texture, style, and a whole new attitude. The dog approved. The cat remained unimpressed—but I’ll take what I can get.
Tools & Materials
Before you start making sawdust and questionable life choices, get your tools together like you didn’t just Google “what’s a miter saw?”
Tools:
- Tape Measure (at least 16ft) – You’ll swear at least 10 times that you just had it two seconds ago. It’s practically part of the process.
- Level – Keeps your wall from looking like it had one too many. Bigger is better here.
- Stud Finder – Beep, beep. It’s doing its job. Magnetic ones like the Studbuddy work great too.
- Miter Saw – For fast, clean cuts. Or use a hand saw… if you enjoy suffering.
- Brad Nailer – Quick, easy, satisfying. If not, grab a hammer and brad nails and call it “arm day.”
- Caulk Gun – For sealing gaps
- Utility Knife – Great for scoring caulk, slicing tape, or finally removing that sticker that’s been taunting you since 2012.
- Pry Bar – For removing baseboards without damaging the drywall (too much)
- Hammer – For tapping boards in place or pulling stray nails.
- Paint brush & Roller – Brushes for corners and other tight spaces, rollers for smooth coverage. The final step to bring your wall to life.
Materials:
- MDF Boards or Real Wood – These are your battens, your main building pieces. 1x3s, 1x4s, or whatever size fits your vision (and your wall). Go with 1x4s (really 3.5 inches wide) for walls wider than 10 feet – it helps balance the look.
- Shims – Because your wall is likely to have commitment issues
- Liquid Nails or Wood Glue – Helps your boards stay put while you nail them in. Think of it as double security—just in case.
- Spackle or Wood Filler – Fills in nail holes, dents, or any “oops” moments. Makes everything look smooth and finished.
- Sandpaper or Sanding Sponge – A quick buff before painting makes all the difference.
- Caulk – Used to seal the gaps between boards and the wall so it looks seamless.
- Primer – Prepares the surface for paint so it goes on evenly and sticks well.
- Paint – The final touch. Go bold, go moody, go “Agreeable Gray”—we won’t judge. Just pick a color that makes you love your wall even more.
Tip: Buy extra boards. You’ll miscut at least one. Probably three. This isn’t pessimism – it’s math.
✏️ Step 1: Plan It Like You Mean It
Before you break out the nail gun, take some time to plan your layout. Start by measuring the width and height of your wall. From there, decide two key things:
How high your batten wall will go
How far apart your battens will be
Just know that the more battens you add, the more cuts, prepping, and painting you’ll be doing later. Choose wisely.
How to Choose the Best Height for a Board and Batten Half Wall
When planning a board and batten half wall, getting the height right is just as important as the spacing—it’s what gives the wall a polished, intentional look. Go too short, and it feels unfinished. Too tall, and it can overwhelm the space.
Here’s how to choose the right height with confidence:
- Go with about half the wall height if your wall is 10ft tall or less
A popular and visually balanced option is to stop your board and batten wall at about half the height of the full wall. This gives it presence without overwhelming the room.
Example: For a standard 8-foot wall (96″), half the height is 48 inches.
If you’re adding a top trim or cap, factor in that extra height so the finished top lands right around the halfway mark.
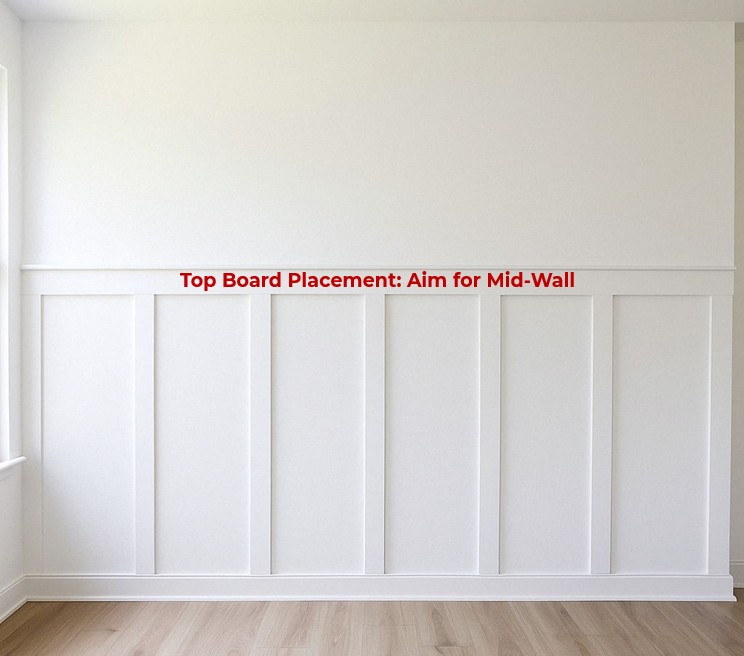
This works well in entryways, living rooms, and hallways—anywhere you want architectural detail without going full floor-to-ceiling.
- Work Around Light Switches and Wall Features
In most U.S. homes, the bottom of standard light switches is installed at 48 inches from the floor. That means if your batten wall height lands exactly at 48″, you might run into issues with trim or top cap clearance.
To avoid awkward interruptions:
- Stop just below the switch (around 44–46 inches), or
- Clear it entirely by going a few inches above (like 54–56 inches)
This keeps your wall layout looking clean and avoids cutting trim around a switch plate.
Once you’ve picked your batten wall height, mark it across the wall as your reference line. Everything else—your battens, trim, and spacing—will build from there.
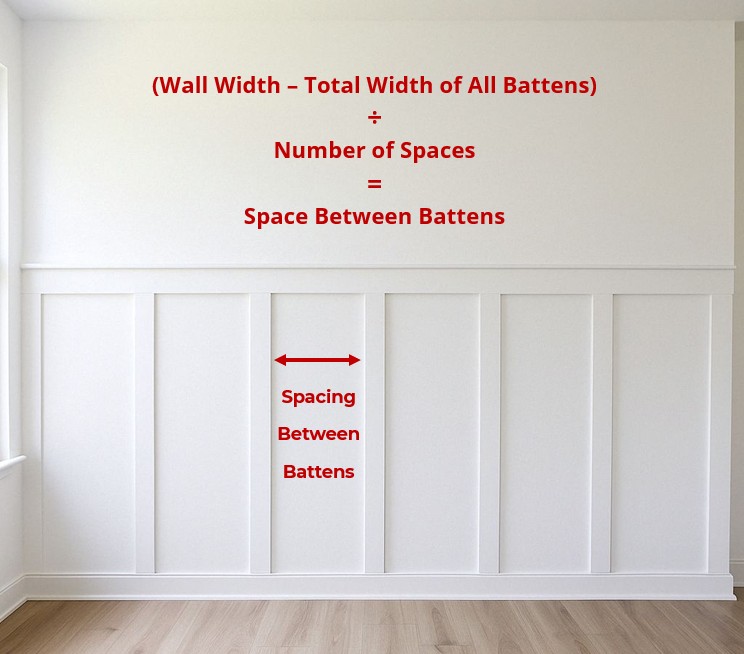
How to Figure Out Spacing for Board and Batten Half Wall
You want your battens evenly spaced and looking intentional—not like you just randomly eyeballed it and hoped for the best. So here’s how to do it step by step – the formula is not scary, I promise:
(Wall Width – Total Width of All Battens) ÷ Number of Spaces = Space Between Battens
- You’ll always start with a batten on the far left and end with one on the far right.
- That means the number of battens is always spaces + 1.
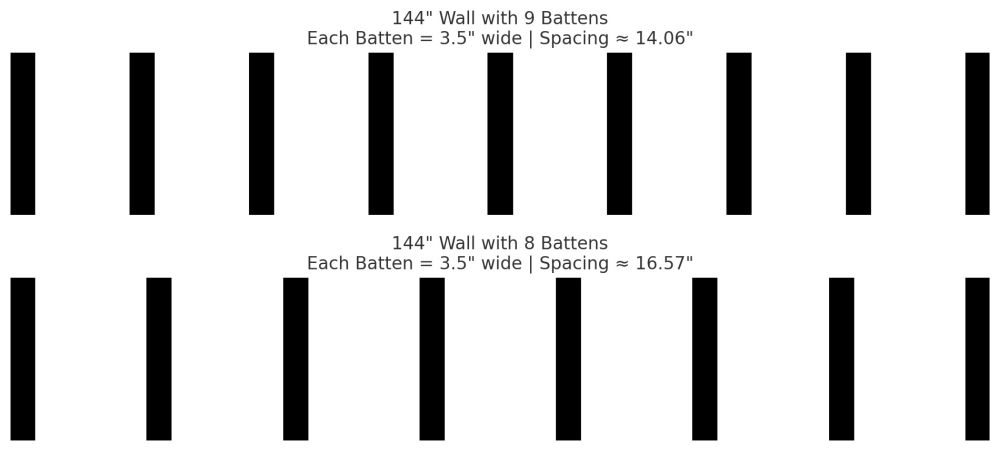
Example: 144-Inch Wall (12 ft wide)
Let’s go with 9 battens (which gives us 8 spaces).
- Batten width total = 9 × 3.5″ = 31.5″
- Remaining space = 144 – 31.5 = 112.5″
- Space between battens = 112.5 ÷ 8 = 14.06 inches
Final layout:
Start with a batten on the far left, then place the next one 14.06 inches apart (edge to edge), all the way across, ending with a batten on the far right.
Going with 8 battens means you’ll have 7 spaces between them.
- Batten width total = 8 × 3.5″ = 28″
- Remaining space = 144 – 28 = 116″
- Space between battens = 116 ÷ 7 = 16.57 inches
Final layout:
Place your first batten flush on the far left. From there, space each batten 16.57 inches apart, measured edge-to-edge, until you finish with your 8th batten on the far right.
This option gives you a slightly wider, airier layout—perfect if you want the wall to feel less busy but still styled.
Tip: Use painter’s tape to visualize the spacing before you start nailing anything in—makes a big difference.
🧽 Step 2: Prep the Wall
Before you start attaching the battens and making sawdust magic, you need a clean slate. That means clearing the wall of anything that doesn’t belong – outlet covers, photos of your dog, and that “Live, Laugh, Love” sign that everyone keeps pretending they like.
Then:
Patch any holes with spackle.
Sand where you patched smooth.
Wipe it down like you’re trying to impress your in-laws.
What About Textured Walls?
If your wall is textured like a Doritos chip, you’ve got two options:
- Cover it with hardboard or smooth panels – This gives you a perfectly flat surface to work on and makes the finished product look custom and crisp. Just make sure you plan to cover up the seams with battens.
- Skim coat it – A little more labor-intensive, but worth it if you want that ultra-smooth, high-end look.
- Embrace the texture – If you’re okay with a little character, keep the texture and just call it rustic charm. It won’t be perfectly smooth, but it’ll still look great.
A properly prepped wall might not be glamorous, but it sets the stage for everything that comes next. Skip this step, and you’ll be fighting with uneven boards, poor adhesion, and paint that just doesn’t sit right.
🧱 Step 3: Frame It Up
1. Install the Top Rail
This is the board that defines the top of your batten wall—and sets the stage for everything else to line up perfectly.
Start with your top horizontal board—typically a 1×4, depending on how bold you want your trim to be. Use a level to draw a straight reference line across your wall at your desired height. Then attach the board using construction adhesive and brad nails.
If your walls are 97 years old and bowed, good luck. Shim and bend like your name’s MacGyver.
If you’re replacing the baseboard, now’s the time to install the new one so everything matches and fits snugly. If you’re keeping the original one, your battens will sit on top of it like guests overstaying their welcome.
2. Place the Vertical Battens (This Is Where It Gets Real)
With the top and bottom in place, it’s time to make your wall start looking like a million bucks.
Start by placing your end battens first—one on the far left, one on the far right. These give you anchors to work from. Then move inward using the spacing you calculated earlier.
Cut each batten to fit perfectly between the baseboard and the bottom of your top rail. Double-check the fit before you start attaching anything. Dry-fitting a few boards first is always a good call.
Use a level on each batten. Seriously. Don’t trust your eyes, your gut, or that feeling you get when it “just looks straight.” This is how you avoid ending up with a wall that looks like a tipsy picket fence.
💡 Pro Tip: Use a spacer block (cut to your calculated spacing) to speed things up and keep the gaps consistent. It’s faster and way less frustrating than measuring each time.
Secure each batten with nails (and adhesive if you want the extra hold). If any boards are a bit bowed, adhesive and a bunch of nails help persuade them to stay in line.
And remember: no shame in using painter’s tape to lay out your design before you commit.
💩 Step 4: Fill, Caulk, and Sand
Ah yes, the “this looks like crap” phase.
Here’s what to do:
- Fill all nail holes and gaps between boards with wood filler or spackle. Let it dry completely before moving on.
- Caulk all edges where the boards meet the wall and each other. Smooth it out with your finger or a caulk tool.
- Sand everything smooth after it dries. You’re aiming for seamless transitions—no bumps, no rough edges, no visible sins.
Tip: Keep baby wipes or a damp rag nearby while caulking. They’re a lifesaver for quick cleanups and smoothing out messy lines.
Don’t rush this part. It’s not glamorous, but it’s what separates a wall that looks “kinda DIY” from one that looks like it was done by a pro.
🎨 Step 5: Paint Like Picasso (But with Primer First)
Ah, the finishing touch—where all your hard work finally comes together and your wall transforms from “under construction” to “wow, who did this?”
Here’s your painting game plan:
- Step 1: Prime everything—boards, battens, edges, awkward corners. Let it dry fully before moving on (no shortcuts here).
- Step 2: Cut in around edges, trim, and inside corners with a brush. It’s tedious, but it sets you up for smooth rolling.
- Step 3: Roll the rest with a small foam roller for an even finish. Take your time. Smooth, steady strokes. You’re not in a race… unless your in-laws are coming over and you told them it was already done.
Tip: Keep a damp rag nearby for surprise drips and accidental wall art. No one needs a rogue roller streak cutting across their perfect batten lines.
📸 Step 6: Celebrate and Post That Sucker on Instagram
You did it. Your board and batten wall is finished.
It’s straight (ish), smooth (mostly), and painted (you nailed it). Now throw some minimalist decor on it, slap up a faux fiddle-leaf fig in the corner, and post that beauty online like the proud DIY parent you are.
🧠 Final Thoughts: Was It Worth It?
Absolutely.
Sure, your back hurts. You inhaled 0.03 ounces of caulk. And you’re now way too familiar with your local hardware store’s layout. But your space?
Transformed.
A board and batten wall adds texture, character, and just enough bragging rights to make your next dinner party obnoxiously satisfying.
Bonus Tips (Because You've Read This Far)
MDF is cheaper and smoother than wood but hates water. Keep it dry.
Real wood is stronger but may warp—check for straightness at the store.
Invest in knee pads if you’re over 30. Your joints will thank you.